Practical Tip – Mini Office

mini office

Here’s a practical tip – Use a Mini Office

What is a mini office?

A mini office is a set of important facts and pictures, reference charts, lists, handy facts and conversion charts pasted and laminated in a file folder for a child’s easy reference.

Why use a mini office?

For homeschoolers, a mini office replaces the conventional school wall charts as well as provide quick references needed for daily work.   Parents should tailor-make their child’s mini office according to their current work requirements.  For example the mini office can include Maths charts, Geography information, handwriting charts, sight vocabulary lists, Social Study facts and charts.

What is in a Maths mini office?

senior mini-officeMaths mini offices change to reflect the skills and information for each stage.  A junior mini office may include numbers, number lines,  names of shapes and colors.  Middle schooler maths mini office may include multiplication charts, addition charts, names of geometric shapes, clocks with time conversions, while high schoolers may include maths formulas, order of operations, percentages, fractions and decimal conversion charts, and so on.

Please click here to download your mini offices.

Read the following mini office posts ~

Hope this handy, practical tip helps you in your homeschooling.

In Grace, Nadene


Free Parables Lapbook

I’m delighted to release my latest free lapbook ~

Free Parables Lapbook

Features ~

  • chronological order parables master list with scripture references in all gospels
  • 38 parables (almost every parable!)
  • complete scripture quotes for every parable in each minibook
  • Modern King James Version
  • simple square design in different folded minibook formats
  • colorful front page art work
  • many minibooks have blank pages inside for the child’s own notes or drawings
  • matching choice of notebook pages, some lined, blank, half page lined, or primary lines

My lapbook elements can be used as ~

  • minibooks and pasted into a lapbook, or,
  • combined with the notebook pages provided, or
  • Collected and stacked as stand-alone minibooks (maybe create a little square box for the pack?)
  • scripture memorization cards

Here are your free downloads ~

  1. Parables Master List  (2 pages)
  2. Parables Booklets 1-9  (10 pages)
  3. Parables Booklets 10-19 (9 pages)
  4. Parables Booklets 20-27 (9 pages)
  5. Parables Booklets 28-34 (11 pages)
  6. Parables Booklets 35-38  (5 pages)
  7. Parables Notebook Pages  (4 pages)
  8. Just for fun, a 1-page-into-10-page minibook ~ Parables – Kingdom of God is like …

I humbly ask that you respect my copyright and request that you link back to my blog if you wish to share these with others.

Be blessed as you dig into God’s word with your children.

Blessings,

New Unusual Minibooks Master Template

Here is a mix of new and unusual minibooks.

I use my Master Template when I create new lapbooks or just need a new minibook for a notebook and minibook combination page. I print out a stash of minibooks to save time.  Sometimes my children want to choose their own minibooks, so I print out and paste the minibooks on a file folder or note paper.  Below are my latest examples:

Minibooks Featured above:

Rolled Inside Page Minibook

  • Cut the vertical slit in the 1 page and roll the inside page horizontally to insert through the slit.
  • Open the page out flat and fold closed around the outer page
  • This book provides up to 6 pages to write on

Arrow Flap Shutter Fold

  • A wonderful minibook for definitions, terminology and vocabulary
  • We use this for our LA study on prefixes and suffixes – prefix on arrow, prefix’s meaning on shutter fold and examples of words with that prefix inside the minibook.
  • Can be used for small diagrams, or science and  maths formulas

A neat narrow Pocket with Strips

  • Fits in several long strips
  • Great for lists and short notes

The common Hexagonal Petal Minibook

  • with 6 flaps/ petal pages for more space to write in your notes

The small Hexagonal Match Book

  • Folds like a matchbook
  • Neat and simple style

The newest unusual minibook is the bottom right corner – Triarama Minibook

  • A 3D fold with the background corner upright and the information corner folds over the bottom corner
  • It lies flat as seen here or folded in a triangle
  • Great for Geography or Science where a diagram forms the background and notes in front
  • My example here is for Maths literacy
  • Excellent for 2nd language with picture behind and vocabulary on the front corner.

Hidden behind the Triarama is the pink Collapsed Triangle Fold

  • Lovely large square for writing and illustrations
  • Folds to a neat triangle
  • Can be used vertically or horizontally

Minibooks Featured above:

A Venn Diagram Flap Minibook

  • Good for comparisons
  • Place pictures on the front covers and write information or lists under the flaps

One-Page 10 Page Minibook

  • A whole page with a simple cut folds to form a 10 page booklet.
  • Valuable minibook for narrations or summaries

Arrow 4 Page Minibook

  • An unusual tabbed minibook with plenty of space for notes and diagrams

A stylish Larger Pull Tab Minibook

  • Really good-sized tab pull with plenty of space for illustrations, notes or summary

Quilt Square Folds in Half

  • An easy quilt square with notes under each corner
  • The quilt square folds in half vertically or horizontally with a bordered front for pictures and title

Minibooks featured Above:

A wonderful new Fact Wheel

  • Write the questions on the outer edge of the big circle and the child writes the answers in the open segment with the same number as the question.
  • As the child turns the wheel the answer appears in the space
  • Great for revision!

An Envelope with Cards

  • Neat envelope and good-sized cards for information of pictures
  • We used stickers to close our envelope and my girls love to use sealing wax for an olden days envelope

Pop-up Card

  • An interesting card with space for 2 pop ups, but you could edit this for 1 picture instead
  • We use this often in Geography to depict rivers, rapids, tidal ocean zone etc.
  • Great for gift cards

A row of Pull Tab Minibooks

  • 3 minibooks in a row
  • Good for definitions, vocabulary and simple notes

I compiled a master template in MS Word version so that you can download and then use the images to make your own minibooks.

This slideshow requires JavaScript.

Click here for your downloads

I will post some MS Word tutorials soon so that you can learn how to simply take the template, choose a minibook and add your own text and images.

PS: I popped a few extra little minibooks in the spaces around the larger minibooks featured here – Enjoy!

Blessings,

Mountains Minibooks & Notebook pages

Here are our minibooks and notebook pages for our study on

Mountains

My youngest daughters are in  junior and middle school level and we enjoyed an overview study of mountains.

We looked at …

pictures of the highest mountains,

snow-capped mountains,

most important mountain ranges on each continent,

famous mountains in many countries,

mountain terms and vocabulary,

measured and compared heights of mountains in our country using our atlas,

and viewed these web sites:

An overview of mountains ~ factmonster.com

How to build a mountain ~ ehow.com

Five North American Mountain Ranges ~  worldatlas.com

Mountains around the world ~ factmonster.com

And then the girls wrote brief notes in their minibooks.

You can download our Mountains Minibook and notebook page here ~ Mountains minibook

You can visit my Geography Free Pages to see the rest of our geography topics and downloads!

Geography ~ Learn About Hemispheres Minibook

My children are studying hemispheres and lines of longitude and latitude in Geography at the moment.

We revised our Lines of Longitude and Latitude with the fun Geography game “Simon Says”.

We watched this YouTube video on Lines of Longitude and Latitude

I created this fun minibook for them ~

The minibook has several circle pages that we stuck to the top or bottom or sides so they could open to show the different lines of longitude or latitude.

You can download this minibook here ~ Hemispheres

Each page has labels and/or pictures ~

  • Page 1:   A globe cut across the Equator to show Northern and Southern Hemispheres.
  • The children draw the major lines of Latitude on this page.

    They cut the page so it opens up and down.

    We attached the top and bottom halves to the base circle.

    (The base circle page is a blank circle with the North and South Poles).

  • Page 2:    Globe with the line of Longitude – Greenwich Meridian cut open to show East and West Hemispheres.
  • This page is split vertically so it opens to each side.

    We attached each side to the left and right sides of the base circle.

    The children cut and pasted the relevant labels.

    The Greenwich Meridan line shows O°and measures co-ordinates for E or W/ day and night/

  • Page 3:     Globe with all the major lines of Latitude: Equator, Tropic of Cancer, Tropic of Capricorn, Arctic and Antarctic Circles.
  • This page is not cut to open, so we attached the circle page to the top of the booklet.

    The children enjoyed drawing in jungles in the torrid zone and tropical islands in the temperate zones.

    Discuss different climates, seasons and vegetation.

    Look at pictures of Equatorial jungles.

    Look at Kiribati chain of coral islands that has land in all 4 hemispheres here.

    • Page 4:    Final page showing Arctic and Antarctic Circles.

    The children correctly place the labels and pictures.

    Look at pictures and animals from the Frigid Zones.

    We used all these links for this Unit Study:

    I am using Intelligo Unit Studies for our Geography course.

    World Atlas – Hemispheres

    Geography.About.com

    How to Teach Latitude and Longitude

    Bible ~ Ruth

    The Book of Ruth

    Here is the “Picture This!” page of the book of Ruth completed by my 10 year-old.

    Picture This! Book of Ruth

    This was a precious book to study and to rejoice in Jesus our Kinsman-Redeemer!  Ruth’s faithfulness and her modest and obedient behaviour inspired my girls.

    This week I let the girls draw their own 0ne-page minibook story.  They did lovely original minibooks:

    This slideshow requires JavaScript.

    If you need blank one-page minibook templates ~ click here

    Gideon & Samson ~ One-Page Bible Minibooks

    We have completed several Old Testament Bible books with “Picture This!”

    We have recently covered the book of Judges:

    OT Bible Book ~ Judges

    “Picture This!’ give a master picture of every book of the Bible as well as a shadow copy, for the students, with faint dotted outlines of the pictures.  They provide detailed notes and guidelines for the teacher and there are separate thumbnail illustrations which show how to complete the pictures .

    The girls colour the pictures as I read the Bible.  We tend to spend about a week or 2 on each Bible book doing about half an hour first thing each day, and the coloured-in page presents a wonderful visual review.

    For enrichment I created these one-page minibooks of Gideon and Samson for more detailed narrations.(Look here for different blank one-page minibook template downloads.)

    The children cut out and correctly paste the speech bubbles (on a separate page) to complete the cartoon-type story summary.

    For Samson I created an intermediate and more advanced minibook. The younger children’s minibook has larger pictures and less writing on the pages. The advanced minibook has more writing and requires more reading and interpretation.

    Here are my 7 year-old’s minibooks ~

    This slideshow requires JavaScript.

    Click here for your one-page minibook downloads ~

    We have just finished our study of the Book of Ruth, so please pop by again soon to see what we did!


    Make Unusual but Simple Books

    These are my favourite books to make in a jiffy and they look so unique!

    The stick and elastic book:

    4 pages + cover + stick + elastic

    stick & elastic book assembled

    1. Assemble, fold or cut the pages to size you need.
    2. Punch in the middle of the folded side.
    3. Insert elastic from back of the book. (Make sure the elastic is as long as the space between the 2 holes you punched.)
    4. Push stick/ twig through loop in the front.
    5. Insert the other side of the elastic at the back of the other hole.
    6. Press stick/ twig through 2nd loop.  (Double loop the elastic if it is slightly too loose.)
    7. Viola! An instant fastened book!

    You can use any kind of stiff  stick ~

    • a kebab stick (cut off the sharp end!)
    • a porcupine quill
    • a cute straw
    • a pencil (not to use, but for the journalism theme)
    • a strong quill feather with a shaft that is long enough not to bend where the elastic hooks over
    • a crochet hook (for a crochet pattern?)
    • a branch from a tree (as in my example for our nature walk)

    The Step Book:

    4 pages folded in steps + punched

    4 pages + stick + elastic

    8 page step book assembled

    1. Use 3 pages to create a 6-step book, or 4 pages to make an 8-step book (and more pages if you wish)
    2. Fold the middle page first so that the fold forms the first step above the bottom of that page. (see above @ step 4+5)
    3. Fold the remaining pages over this middle page so that all the steps seem equal.
    4. When the pages make equal steps, crease firmly.
    5. Hold all the pages in place with  paper clips, and open the top folds.
    6. Punch a hole at each side over the fold line.
    7. Assemble with string/ ribbon/ raffia bows on each side or
    8. Use stick and elastic to secure as above, or
    9. Simply staple all the pages together at the top.
    10. There! Your step book is ready to use!

    These and other excellent ideas are found at Susan Kapuscinski Gaylord’s site Makingbooks.com.

    We use these books for lapbook, for spontaneous journals, for nature walks, for games and for gifts.

    How could you use them?

    One-Page Minibook Templates

    We like to make minibooks that have several pages using only 1 piece of paper. 

    Here are 4 simple minibooks that my young children cut and fold without any trouble.

    Teach your children to fold these minibooks on all the lines first and then cut on the dotted lines. Assemble the minibook by folding page 2 in towards page 3 and so on. 

    (I have printed the page numbers on the top corner of each page.)

    Here’s your download ~

    4 One Page Minibook Templates

    1. The hotdog one-page minibook

    Creates an 8 page minibook.  All 8 pages are on the one page, which is excellent for printing and photocopying.  It is easy to cut the centre fold – just fold the page in half across the width and cut through the double paper on the dotted line.  Now open the page and re-fold the page in half lengthwise (which is why it is called a hot dog fold). Press the opening apart to form a diamond. Now flatten all the pages to form the book.

    Although this seems tricky, my kids use this often and so they do it in a snap! (Look at the photos in my letterboxing post.)

    2.   The long cut minibook

    Is the easiest minibook to cut and assemble and creates a 10 page portrait (tall) style minibook.  Page 1 and page 10 are on the reverse of the page.  If you are printing or photocopying this minibook with pictures or text, you will have to print these pages separately, then cut and paste pages 1 & 10 to the front and pack pages of this minibook.

    3.  The T-cut minibook

    Is simple and easy to create.  It also forms a 10 page portrait (tall) style minibook.  Page 1 and page 10 are on the reverse of the page.   If you are printing or photocopying this minibook with pictures or text, you will have to print these pages separately, then cut and paste pages 1 & 10 to the front and pack pages of this minibook.

    4.  The landscape minibook

    Is the most unusual minibook, yet it is simple  to make.  It forms a 10 page landscape (wide) style minibook.  Page 1 and page 10 are on the reverse of the page. If you are printing or photocopying this minibook with pictures or text, you will have to print these pages separately, then cut and paste page 1 & 10 to the front and pack pages of this minibook

    Some practical tips:

    • Print out and fold  then cut each of the 4 different one-page folds. Discover which folds are easy!  They all are! 🙂
    • You can glue the folded pages together that fold back-to-back for extra firm minibooks.  (I’m going to experiment with sliding tabs or pop out concepts)
    • Keep a few printed blank pages in plastic protective sleeves (with all your other blank minibooks –  minibook master template download) in your lapbook file ready to use.

    Enjoy these new pages!

    Blessings, Nadene

    Famous Artists Lapbook ~ loads of minibooks!

    This Famous Artist Lapbook features ~

    Leonardo da Vinci, Michelangelo di Lodovico, Raffael Sanzio da Urbino, Sandro Botticelli, Anthony van Dyck, Rembrandt van Rijn, Johannes Vermeer, Francisco Goya, Pablo Picasso, Auguste Rodin, Peter Paul Rubens, Salvador Dali, Henry Moore and Paul Jackson Pollock

    I have created a ‘blank canvas’ type lapbook as each minibook is blank and the thumbnails are separate.  This means you can use the download as it is and cover every artist, or you could use the minibook templates and use them to feature several works of 1 artist. There is an organized lapbook planner with web site links as well as a page of extra application ideas.

    Here some samples of the 20 pages:

    Famous Artist Lapbook planner 1

    Applications & Ideas

    Leonardo da Vinci

    Michelangelo

    Rembrandt Van Rijn

    Raphael da Urbino

    Sandro Botticelli

    Sandro Botticelli

    Salvador Dali

    Salvador Dali

    Peter Paul Rubens

    Pollock

    Auguste Rodin

    Anthony van Dyck

    Pablo Picasso

    Matching Masterpieces

    Pockets of paintings & sculptures

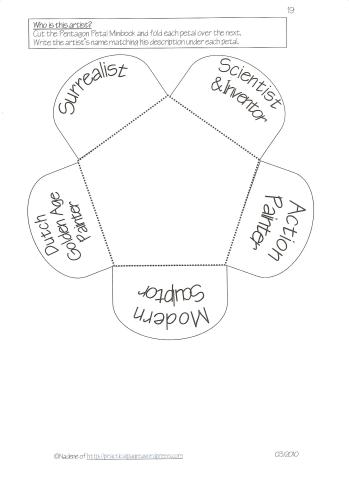
    Who is the artist pentagon petal minibook

    Click here for your download ~ Famous Artists Lapbook

    The Famous Artist Lapbook is an excellent addition to the Famous Artist Wall Chart and the Famous Artist Biography Pages.

    Copyright © 2015 Nadene Esterhuizen

    All rights reserved.  Please email me for permission granted for personal use only.  No part of this publication may be shared, stored, sold, reproduced, or distributed without my written consent.

    I have created a simple lapbook base from which you may launch in any direction!  You may want to use each minibook or its suggested activity or create this lapbook in your own way.

    • You can use these pages as they are.  Cut and paste the name of the artist on the front of each minibook.
    • All the minibooks have been left blank so that you may pick and choose the style you need or prefer.
    • Let your child write Charlotte Mason-type narrations (detailed and accurate recall) of the art work inside the minibooks for art appreciation lessons.
    • You could cover just 1 artist and use the collection of minibooks to do several minibooks on his different works.
    • Collect all minibooks and assemble a lapbook on the entire topic or featuring 1 artist.  Let your child assemble the lapbook when they complete the whole unit.